We'll share all our projects, recipes, decor & organization ideas, home improvement, and everything in between!

Friday, July 29, 2011

It's Been a While!

Well, I am finally getting around to updating our blog! My last post was in March 2011- I was newly pregnant, and just starting to feel not-so-good...so then followed a period of time where all I could do was sleep and puke (no time for blogging!)...HAPPILY those days are now done, but then it was full speed ahead to learn about the vast new world of "Babyland". So much to learn, do, and prepare for as we look forward to welcoming our new addition in November: Azalea Marian Vawter.
Lilypie Pregnancy tickers
I wanted to post a few pictures of things I've been working on for the nursery, etc. We have had so much fun creating and making mostly all the decor in the nursery.
Here are a few pictures:
HANGING FLORAL  BALLS
I wanted to make some sort of creative, visually interesting decor that could serve as a spin off of a baby mobile. There are so many creative ideas out there in nurseries now, and I wanted something unique and specific to her nursery theme/decor. We already have a musical/electronic image mobile that projects onto the ceiling, so I really didn't need anything that was truly going to serve as a mobile...just wanted the concept to be there. I used grapevine balls (1 large, 2 small) as the forms. Then I glued about 200 little hydrangea flowers to the balls, leaving a few gaps where the grapevine could peep through. I think it creates a very natural, breezy, floral feel!


IT'S A GIRL WREATH
This wreath will be for our hospital room door, and then our front door when we come home. I got the idea from a pinterest photo, but modified it to what I wanted. I wrapped the entire grapevine wreath in a gauzy/glittery tulle, then I used a pink feather boa and hotglued & wired it into place around the wreath. Then I added a giant bow and an "It's a girl" sign. It was so easy and turned out really cute!


OTHER NURSERY RANDOMS
SHELF:
We found this shelf at a thrift store for $1.99. We painted it, added wainscoting to the back of it, added some cute pink knobs, and it looks completely different from when we bought it!


CURTAINSI could not find any curtains that were what I wanted, so I made my own! (sort of!). I bought two valences on sale at JCP. Then I sewed them together in a layered fashion, to give the curtain a little more thickness and layers. I sewed some white trim and some brown trim on top of that to tie in all the colors of the nursery, and give it more visual interest. Kind of hard to see in this picture-sorry! We found a nice Roman Shade on clearance at Lowe's for $10! Gotta love a bargain!


MONOGRAM MIRROR
Some friends of ours gave us this large mirror when they moved to Illinois and couldn't find room for it in the moving truck! It is such a large, nice mirror and I love how it brightens the room and makes it seem larger...so there was no way I was parting with it...I just had to find a way to work it into the Nursery decor. We started by putting in the lattice trim pieces to create "frames" for my monogram blocks. We painted the mirror. Using painters tape, we sectioned off the three squares and covered all other surfaces of the mirror. Andy spray painted inside the squares to create the pink background for the letters. I ordered the custom letters online and we held our breaths and we put the letters on - making sure they were level, centered, and safely transferred was tricky work! I love how it came out!

 FAMILY TREE FRAME:
Found the frame on clearance for $15 at Hobby Lobby. Spray painted it cream to match our wainscoting/trim and really made it "pop" against the brown walls. Now I'm in the process of gathering pictures of all our family (Azalea's grandparents, Aunts, Uncles, and Cousins) so that she can see their faces every day! I can't forget to mention that Andy meticulously painted and put up the wainscoting in this room. He really was hoping he could talk me out of it, but in the end it was worth the extra work and we both love how it looks!


OTHER PROJECTS:
I've also been making hairbows and felt flowers. They are so fun to make and I can customize the colors to match outfits that she has!
The instructions for the felt flowers are at this blog: http://www.bystephanielynn.com/2010/08/felt-flower-ornament-no7.html
Instead of making an ornament though, I just used a 2 1/2 inch round felt piece as the base/backing and created a flower for a headband instead. I also added an actual gemstone instead of glitter.


It's been so fun working on all of these projects! It is so neat to see the nursery coming together...my goal of having it completed by the summer's end is totally on track!

Sunday, March 20, 2011

Hobby: Creative organization

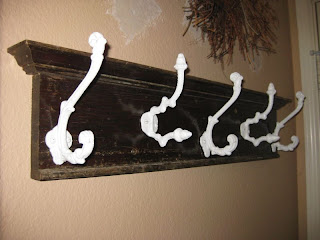
I've been looking for a some coat hooks for our laundry room/mud room. However, the same old run-of-the-mill coat hooks from Lowes and Target just weren't cutting it. So, we ventured off to our local flea market (3rd Monday Trade Days in McKinney!) to see what we could find!


We purchased an antique window header from one lady, and then walked a few booths down to find some unique hardware hooks to complete the project. I chose 2 of one style / 3 of another style to add some visual interest. After priming and painting the hooks, we were ready for installation. Andy measured and marked where I wanted the hooks on the header...and here's the finished results (we had to fill in some wall holes from the previous picture frame, so don't mind the wall patching that we are currently working on!):

Hobby: Our Pugs, Izzy & Myla

I wanted to post an update about our sweet little rescue pug, Myla. We have had her in our care since October, and she has made so many improvements!


She recently had dental surgery and had 8 teeth pulled! Her appetite and playfulness greatly improved after that, so all those teeth must have been causing some problems! Her coat, which was patchy and sparse due to malnutrition while whelping, has grown back in thick and shiny. She has recovered from a severe ear infection and allergies that had never been treated until we received her in October. While she has come a long way in recovering from her fear of humans, she is still a little shy and reserved. However, she has really come around for me especially, and loves to follow me around the house, snuggle, and play. She and Izzy have become best friends. Although she may always be our shy little girl, we know that her life has improved 100% since coming here. She is safe and happy and we are grateful that she is a part of our lives!

Wednesday, February 9, 2011

Hobby: Valentine's Day Wreath

SO, today is snow day #5 here in Texas! This time I am prepared...went out to Hobby Lobby yesterday and bought the supplies to make a wreath, in the event that I was stuck in the house for another snow day. We also have milk, eggs, tp, chocolate chip cookies, and all the other necessities you don't want to be without!

This wreath was so easy to make! Start with a wreath form. Use whatever flowers you think look best...I was also looking at some gorgeous (and expensive) red roses...but decided on the red geraniums. Cut the stems off, and hot glue the heads of flowers around the center of the wreath! Ta-Da! This is gonna look great on my front door...as soon as the snow stops and I am brave enough to face the cold and open the door!
Wishing you all a very Happy Valentine's Day!


Tuesday, February 1, 2011

Hobby: Valentine's Day Treats

As I was trying to decide what to give my girlies for Valentine's Day, the thought occurred to me that if I have to eat another cupcake or piece of chocolate right now, I just might gag. We have had several weeks of nothing but sweets at work it seems...so in an effort to help myself and my co-workers, I came up with a (hopefully) refreshing change from all the sweet stuff.
How about some yummy tea in a cute little package on a chilly February 14th? Here's how I made it: Purchase some high quality tea. I chose Numi Organic Chocolate & Vanilla Black Tea. (so, Chocolate is still in the name...just less sugar and calories!). Get some cute scrapbook paper (some sort of pink, red, or Valentine's print), matching ribbon, and some sort of cute label or tag for the front. Cut the paper in strips, wide and long enough to form an envelope for the tea bag. I don't think I need to include an further instructions - it is so easy and you can add whatever twists of your own!


Hobby: Scarf Charms

Today is a snow day in Texas, so I've had some extra time to update my Etsy account, my blog, and to created a Facebook page for my Etsy account! All good things - technology is wonderful when it works!
Please check out my blog, and don't forget to "Like" my page on Facebook too! It's still a work in progress, but we just go news that tomorrow is another snow day, so at least I have something to keep me busy!

Sunday, November 14, 2010

Hobby: Scarf Charms, now on Etsy!


So, I've been working extra hard on one of my craft hobbies lately because I've finally decided to jump on the Etsy Bandwagon! I've been making "Scarf Charms" for a year now, some I've sold to friends, some I've given as gifts, and some I just make for myself...but after about the 10th stranger (over a period of time) stopped me in the grocery store to ask me where they could buy the scarf clip I was wearing, I decided it was time to try Etsy. SO...over the past week I've been doing the research, making my product, figuring out pricing, shipping, and product packaging, etc. So I think I'm ready now! Hope you'll check them out!